Configuring Ingress and TLS Certificates with Traefik and Cert-Manager
Introduction
This setup provides a robust solution for exposing services on your local network or the internet with valid SSL/TLS certificates. By combining Traefik's routing capabilities with Cert-Manager's certificate automation (using Cloudflare DNS challenge in this example), you avoid browser security warnings and ensure encrypted traffic. This method avoids using Traefik's built-in ACME storage, which can be problematic with persistent volumes in clustered environments, preferring Cert-Manager's Kubernetes-native secret management.
Prerequisites:
-
Running Kubernetes Cluster: A working cluster (e.g., K3s) with nodes ready.
-
Load Balancer:
kube-vipinstalled to provide a stable LoadBalancer IP for Traefik. -
Helm Installed: The Helm package manager must be installed on your workstation.
-
Domain Name: A domain managed by a provider that supports DNS challenges (we are using Cloudflare in this guide).
Install Traefik
We will use Helm to install Traefik. We'll force it to redirect to HTTPS and manually assign your Kube-Vip IP so it remains static via Helm values file.
Create the file traefik-values.yaml
# 1. High Availability
# Run 2 replicas so if one node goes down, Traefik stays up.
# deployment:
#   replicas: 2

# 2. Service Configuration & Kube-VIP
service:
  type: LoadBalancer
  # This annotation tells kube-vip which specific IP to advertise
  annotations:
    kube-vip.io/loadbalancerIPs: "192.168.100.101"

# 3. Port Configuration & HTTPS Redirect
ports:
  web:
    http:
      redirections:
        entryPoint:
          to: websecure
          scheme: https
          permanent: true
  websecure:
    http:
      tls:
        enabled: true
Add Traefik to the helm repo and install with the arguments from traefik-values.yaml
helm repo add traefik https://traefik.github.io/charts
helm repo update
helm install traefik traefik/traefik -n traefik --create-namespace --values traefik-values.yaml
Verify the installation. You should see a LoadBalancer service with the external IP you have set as the load balancer IP.
kubectl get pods -n traefik
kubectl get svc -n traefik
Deploy Cert-Manager
Cert-Manager is a native Kubernetes certificate management controller. Its primary purpose is to automate the issuance and renewal of SSL/TLS certificates from various sources, such as Let's Encrypt, HashiCorp Vault, or self-signed CAs. It ensures certificates are valid and up-to-date, storing them as standard Kubernetes Secrets so they can be easily consumed by Ingress Controllers (like Traefik) without complex volume mounts.
Add cert-manager repo
helm repo add jetstack https://charts.jetstack.io
helm repo update
Create cert-manager-values.yaml
crds:
  enabled: true
namespace: "cert-manager"
extraArgs:
  - --dns01-recursive-nameservers-only
  - --dns01-recursive-nameservers=1.1.1.1:53,1.0.0.1:53
Install cert-manager
helm install cert-manager jetstack/cert-manager --namespace cert-manager --create-namespace --values cert-manager-values.yamlCloudflare DNS-01 Challenge Setup
We will use Cloudflare for the DNS-01 challenge, which allows issuing certificates for internal IPs/domains as long as you own the public domain.
Cloudflare API Token
You must give cert-manager permission to edit your DNS records.
-
Go to the Cloudflare Dashboard.
-
Create Token -> Use the Edit zone DNS template.
-
Permissions: *
Zone->DNS->Edit-
Zone->Zone->Read
-
-
Zone Resources:
Include->Specific zone->yourdomain.com. -
Copy the Token (e.g.,
zXy...).
Create the API Token Secret
kubectl create secret generic cloudflare-api-token-secret \
  -n cert-manager \
  --from-literal=api-token=YOUR_ACTUAL_CLOUDFLARE_TOKEN
Create the ClusterIssuer (cert-manager-clusterissuer.yaml):
apiVersion: cert-manager.io/v1
kind: ClusterIssuer
metadata:
  name: letsencrypt-cloudflare
spec:
  acme:
    email: your-real-email@email.com
    # do not forget to put your email address
    server: https://acme-v02.api.letsencrypt.org/directory
    privateKeySecretRef:
      name: letsencrypt-cloudflare-account-key
    solvers:
    - dns01:
        cloudflare:
          apiTokenSecretRef:
            name: cloudflare-api-token-secret
key: api-tokenkubectl apply -f cert-manager-clusterissuer.yamlHigh Availability Test (NGINX)
Here's an example NGINX deployment, service and ingress in one file to test with:
Create nginx-ha.yaml:
apiVersion: apps/v1
kind: Deployment
metadata:
  name: nginx-ha
spec:
  replicas: 3
  selector:
    matchLabels:
      app: nginx
  template:
    metadata:
      labels:
        app: nginx
    spec:
      affinity:
        podAntiAffinity:
          requiredDuringSchedulingIgnoredDuringExecution:
          - labelSelector:
              matchExpressions:
              - key: app
                operator: In
                values: ["nginx"]
            topologyKey: "kubernetes.io/hostname"
      containers:
      - name: nginx
        image: nginx:latest
---
apiVersion: v1
kind: Service
metadata:
  name: nginx-svc
spec:
  selector:
    app: nginx
  ports:
  - port: 80
---
apiVersion: networking.k8s.io/v1
kind: Ingress
metadata:
  name: nginx-ingress
  annotations:
    traefik.ingress.kubernetes.io/router.entrypoints: websecure
spec:
  ingressClassName: traefik
  tls:
  - hosts: ["nginx.homelab.penguincave.link"]
    secretName: homelab-wildcard-tls
  rules:
  - host: nginx.homelab.penguincave.link
    http:
      paths:
      - path: /
        pathType: Prefix
        backend:
          service:
            name: nginx-svc
            port:
              number: 80
Apply:
kubectl apply -f nginx-ha.yamlNow that we have a test deployment, we'll need to setup the certificate for it.
Create nginx-certificate.yaml
apiVersion: cert-manager.io/v1
kind: Certificate
metadata:
  name: nginx-cert # cert name!
  namespace: nginx  # Namespace where your app is running
spec:
  secretName: nginx-cert-secret # The name of the secret where the cert will be stored
  issuerRef:
    name: letsencrypt-cloudflare
    kind: ClusterIssuer
  dnsNames:
  - "nginx.homelab.penguincave.link"
You may need to wait for a moment that might take for a few hours for the DNS to propagate and to validate the DNS challenge. You may check it by using this command to watch for your certificate:
kubectl get certificate -n nginx -w
If it's taking a while, look for errors in the logs:
-
Check Cert Status:
kubectl get cert -n traefik -
Check DNS Challenge:
kubectl describe challenge -n traefik
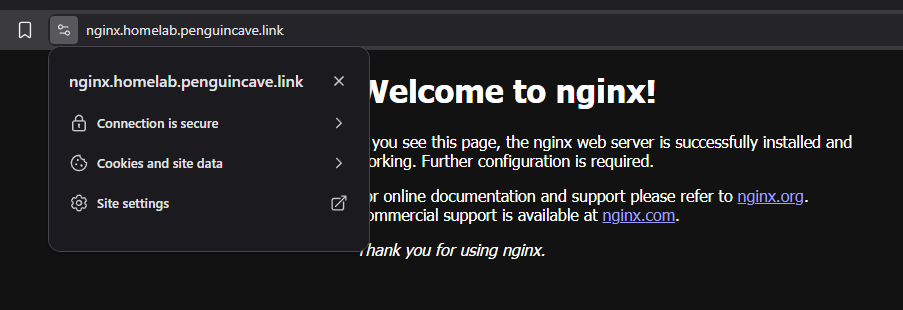
Once "True" you should be able to browse your nginx deployment with working and secure TLS certificates. :)