High-Availability k3s Cluster Guide with k3sup and kube-vip
Introduction
What is k3s?
k3s is a lightweight, fully compliant Kubernetes distribution designed for low-resource environments. It simplifies installation and management, making it perfect for development, testing, or small clusters.
Why k3sup?
k3sup (“ketchup”) is a simple CLI tool that installs k3s over SSH on any remote server. It handles the complexities of bootstrap, joining nodes, and copying kubeconfig automatically—ideal for lab setups or multi-node deployments.
Why kube-vip?
k3s HA clusters require a load balancer or a virtual IP to ensure the control plane remains reachable if a master node fails. kube-vip provides a lightweight, Kubernetes-native virtual IP that floats between master nodes, maintaining high availability without complex external load balancers.
Prerequisites
-
Nodes: At least 3 nodes (in this guide, we'll have all 3 nodes as the control plane and worker)
-
OS: We are going to use Debian but most Linux distro would be fine
-
Network: All nodes must communicate over a LAN
-
Tools installed locally:
sshaccess to all nodes,curlorwget -
Architecture note: Can mix ARM and x86_64 nodes. In my case, I currently have two Raspberry Pis and an old refurb ThinkPad X240. If you are using a Raspberry Pi, it's important that you edit cmdline.txt in /boot/firmware, then add:
cgroup_enable=cpuset cgroup_enable=memory cgroup_memory=1. Those kernel parameters are related to Linux control groups (cgroups), which Kubernetes (and therefore K3s) relies on to manage resource allocation for containers.
Installation
Now let's get our hands dirty. With k3sup making our life easier, we can just configure everything from our local computer's command line. I would recommend you to spin up a Debian WSL if you are on Windows so you can have a Linux environment command line.
Install k3sup:
curl -sLS https://get.k3sup.dev | sh
sudo install k3sup /usr/local/bin/
k3sup uses ssh to connect to the server and agent nodes so we need to copy our public key. Generate a public key by executing:
ssh-keygenCopy the generated ssh keys to your nodes, and don't forget to note where your ssh keys are generated:
ssh-copy-id sysad@192.168.100.201ssh-copy-id sysad@192.168.100.202ssh-copy-id sysad@192.168.100.203Note: Make sure your Linux user for every node is not required to re-enter password. Add it to visudo by executing sudo visudo and adding the line:
[your-linux-user] ALL=(ALL) NOPASSWD:ALL Install the kubectl (so you can run commands off your non k3s environment)
curl -LO "https://dl.k8s.io/release/$(curl -L -s https://dl.k8s.io/release/stable.txt)/bin/linux/amd64/kubectl"
chmod +x kubectl
sudo mv kubectl /usr/local/bin/
mkdir -p ~/.kubeWe are now ready to install and configure your first master node:
k3sup install \
--ip 192.168.100.202 \
--tls-san 192.168.100.210 \
--cluster \
--k3s-channel latest \
--ssh-key ~/.ssh/id_ed25519 \
--k3s-extra-args "--disable servicelb --disable traefik" \
# OPTIONAL: You can add "--data-dir /your/path" inside the --k3s-extra-args quote in case you want to set where k3s data will be stored. Default is /var/lib/k3s
--local-path ~/.kube/config \
--user sysad
--ip 192.168.100.202
Specifies the IP address of the target node where k3s will be installed.
-
This is the actual node IP, not the virtual IP
-
k3supconnects to this address over SSH to bootstrap k3s
--user sysad
The Linux user account used for the SSH connection.
-
This user must have passwordless sudo access
-
k3supuses sudo to install and configure k3s on the node
--cluster
Enables cluster mode instead of single-node mode.
-
Generates and stores a cluster join token
-
Allows additional control-plane and worker nodes to join later
-
Required for high-availability setups
--ssh-key ~/.ssh/id_ed25519
Explicitly specifies the SSH private key used to connect to the node.
-
Prevents
k3supfrom defaulting to~/.ssh/id_rsajust in case it is on another directory. -
Useful when using modern
ed25519keys or multiple SSH identities
--tls-san 192.168.100.210
Adds an extra Subject Alternative Name (SAN) to the Kubernetes API server TLS certificate.
-
This value should be the control-plane virtual IP (VIP)
-
Ensures the API server certificate remains valid when accessed via the VIP
-
Required when using kube-vip or any external load balancer
Without this option, accessing the API via the VIP would result in TLS errors.
--local-path ~/.kube/config
By default, k3sup generates the kubeconfig file in your current directory. We'll set this argument to have the file generated in ~/.kube/config, kubectl's default location. kubectl will find it automatically without needing any export command at all.
The command below will allow you to use the kubectl command, in case it is located in other that the default directory, or if you are having issues executing kubectl commands:
export KUBECONFIG=~/.kube/config--k3s-extra-args "--disable servicelb --disable traefik"
Passes additional arguments directly to the k3s server.
In this setup:
-
servicelbis disabled because kube-vip is used as the service load balancer -
traefikis disabled to allow installation of a custom ingress controller later (e.g., NGINX, HAProxy, or Traefik deployed manually)
Disabling unused components keeps the control plane lean and predictable.
Before we join the rest to the cluster, it's nice to have kube-vip installed and configured first.
Run the following commands as root user on the first master node.
Apply RBAC permissions:
#Create directory
mkdir -p /var/lib/rancher/k3s/server/manifests/

# Get the RBAC manifest and place in the auto-deploy directory
curl https://kube-vip.io/manifests/rbac.yaml > /var/lib/rancher/k3s/server/manifests/kube-vip-rbac.yaml

# (Optional) apply RBAC manually
kubectl apply -f https://kube-vip.io/manifests/rbac.yaml
This command ensures kube-vip has the required roles and permissions in the cluster by creating a ServiceAccount, ClusterRole, and ClusterRoleBinding. It’s necessary before deploying kube-vip as a DaemonSet or LoadBalancer controller.
# Set config variables
export VIP=<virtual-ip-for-kube-vip>
export INTERFACE=<network-interface-name>
KVVERSION=$(curl -sL https://api.github.com/repos/kube-vip/kube-vip/releases | jq -r ".[0].name")
alias kube-vip="ctr image pull ghcr.io/kube-vip/kube-vip:$KVVERSION; ctr run --rm --net-host ghcr.io/kube-vip/kube-vip:$KVVERSION vip /kube-vip"
Apply manifest:
# Generate Manifest
kube-vip manifest daemonset \
    --interface $INTERFACE \
    --address $VIP \
    --inCluster \
    --taint \
    --controlplane \
    --services \
    --arp \
    --leaderElection | sudo tee /var/lib/rancher/k3s/server/manifests/kube-vip.yaml
Based on my experience, I've had a lot headaches with Kube-VIP and the default service LB messing up the networking by grabbing any IP from my subnet. I recommend to edit kube-vip.yaml and remove this dhcp_mode env.

# Apply manifest
kubectl apply -f /var/lib/rancher/k3s/server/manifests/kube-vip.yaml
Install Kube-vip Cloud Provider: Kube-vip needs a "Cloud Provider" to watch for the loadBalancerIP field in your YAML and tell the main Kube-Vip process to broadcast it.
kubectl apply -f https://raw.githubusercontent.com/kube-vip/kube-vip-cloud-provider/main/manifest/kube-vip-cloud-controller.yamlConfigure the Global IP Pool: Kube-Vip needs to know which IPs it is allowed to hand out. Create a ConfigMap for it:
apiVersion: v1
kind: ConfigMap
metadata:
  name: kubevip
  namespace: kube-system
data:
  range-global: 192.168.100.102-192.168.100.102 # Just your Pi-hole IP for now
Apply manifest:
kubectl apply -f kube-vip-config.yamlFor some reason, the default service LB spawns when I reboot, even though we strictly set an argument while installing via k3sup. So I recommend manually adding these lines in /etc/rancher/k3s/config.yaml
disable:
  - servicelb
Now we can join the rest of the nodes. Run this to your non k3s terminal (Debian WSL in my case):
# nasse-pi
k3sup join \
--ip 192.168.100.203 \
--server-ip 192.168.100.202 \
--server \
--k3s-channel latest \
--user sysad \
--ssh-key ~/.ssh/id_ed25519
# --k3s-extra-args "--data-dir /your/path" - OPTIONAL: In case you want to set where k3s data will be stored. Default is /var/lib/k3s

# meyza-pi
k3sup join \
--ip 192.168.100.201 \
--server-ip 192.168.100.202 \
--server \
--k3s-channel latest \
--user sysad \
--ssh-key ~/.ssh/id_ed25519
# --k3s-extra-args "--data-dir /your/path" - OPTIONAL: In case you want to set where k3s data will be stored. Default is /var/lib/k3s
Open your local kubeconfig file your local terminal, which is the Debian WSL in my case.
sudo nano .kube/config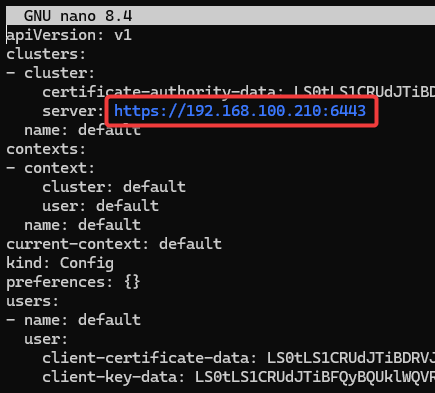
Change server: In my case, from https://192.168.100.202:6443 to the floating/virtual IP https://192.168.100.210:6443.
Now, your WSL terminal talks to the cluster via the Floating IP as well.
export KUBECONFIG=~/.kube/configor you can make it permanent:
echo 'export KUBECONFIG=$HOME/.kube/config' >> ~/.bashrc
source ~/.bashrc
That's it! You now have a highly-available k3s cluster. Next up, we'll configure a distributed storage for our cluster.